
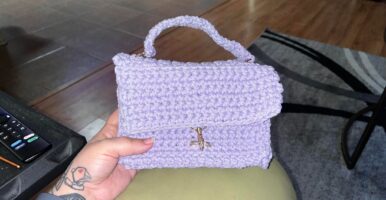
So the first purse 🙂 I had some definite improvements to make as I worked through it and this time using a brand new material for me to crochet in for that structure I was looking for!!
This time around I used macrame cotton cording, in a beautiful lavender if I do say so myself! I think if I delve into a third pattern I have even more ideas to make the edges cleaner and maybe upgrade the hardware a bit but this one. I’m definitely taking on vacation with me. perfect size and holds it’s own without me thinking the handles going to rip off since I crocheted it in!
Side (crochet 2 of these)
CH 7, sc across ch1 and turn, for 15 rows (or however tall you’d like your purse but I did 15 rows)
Bottom
CH 7, sc across ch1 and turn, for 20 rows (I only wanted my purse to be slightly wider than my phone is tall, but please be mindful of the material you are using and your gauge, you may need more or less rows than mine)
Back
CH 19 (I think because I went 20 rows on the bottom and the first row is kinda less), sc across ch1 and turn, for 15 rows (to match the height of the sides)
Top
CH 7
Rows 1 & 2: sc across ch1 and turn
Row 3: sc twice, on third sc loop in hardware, on fourth sc loop in hardware, sc twice to finish the row
Row 4 – 17(or 3 fewer rows than the rows you made your bottom piece): sc across ch1 and turn
Row 18: Repeat Row 3 with hardware
Rows 19 & 20: sc across ch1 and turn
Front inside
CH 19 (to match the back, top, and bottom width)
Rows 1 & 2: sc across ch1 and turn
Row 3: sc 8 times, on the 9th & 10th sc loop in hardware, sc 8 more times to finish the row, ch1 turn
Row 4 – 14 (one fewer row than the sides and back so the top front flap lays over it): sc across ch1 and turn
Now I attached the side, to the bottom, to the other side.
Then I stitched around the side, bottom, side, to attach the back piece.
And stitched across the bottom and front to attach then up the sides.
This would have been a lot easier if I used a blunted yarn sewing needle and not the crochet hook as I did in the video but alas I didn’t have one of those with me in Arizona.
And this leaves us with a box of a purse, the top, front lid, and handle are not yet done.
Handle
CH 3, sc twice through the hardware on the top, ch 1 turn
Now you can sc across and turn for however long you want, but I just like a handheld handle so I really just went till row 20, nothing like a crossbody strap or a book bag strap, but depending on where you put the hardware that’s definitely something I’d try in the future.
Once you have the handle as long as you want it to me, sc it on the other hardware on the top piece, making sure you don’t twist it (unless you want that look could be cute!) and finish off, tucking in the remaining yarn within the handle so it doesn’t fray
Front lid
Start on the top long edge, sc across just the bottom loops of the top piece (so there’s a turndown angle), ch 1 and turn
Now you’ll be attaching your closing hardware here, mine was a clip that was quite tall so I had to attach it after
Rows 2 – 8: sc across ch1 and turn
Row 9: sc 8 times, on the 9th & 10th sc loop in hardware, sc 8 more times to finish the row, ch1 turn
Row 10: sc across, and finish.
Attach the top to the back long edge and tuck in any loose edges and now you’re finished!
Things I’d do differently next time, perhaps a fabric yarn (which seems to look soft and stretchy also known as t-shirt yarn I think), and I’d also stitch the pieces more together using the front lid back loops method more so they’re all together and need fewer seams.
Thank you for reading and if you try please let me know here or in the youtube video!